Great photos, Tony. They look professional. This is an excellent lesson for anyone using a "point & shoot" camera (and an inexpensive set-up). I am looking forward to seeing more examples of outdoor shooting on an overcast day, even with a "smartphone".
It's a common result for folks to take a reflective item such as a knife and shoot indoors with a "smarthone" or a "point & shoot" camera, many times, unconsciously, with the flash mode on, washing out details in the subject.
This flash washout gets worse when one lays the knife and sheath on a shiny wood surface, and they can't understand why it's overexposed.
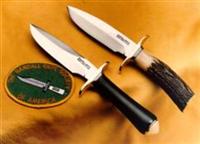
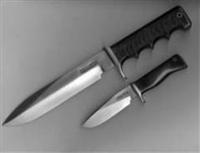
"Take It Outside On An Overcast Day"! Look at the detail in Tony's outdoor image.
Alternative backgrounds are wood decks, trees stumps, and an 18" square of linoleum tile with a textured or "wood" or "granite" pattern. The tile background make it appear as if the knife were shot inside on the floor. Outdoor overcast lighting will make a photo more acceptable & professional looking. This lighting IS hard to beat (& cheap, too).
To get really sharp images with a camera, set the aperture at f/8 or f/11 ( if you camera permits) and put the camera on a tripod. It doesn't matter whether the tripod cost $25 or $250, the camera becomes rock-solid. If you don't have a remote shutter release, use the camera's self-timer feature and set it for 5 or 10 seconds. This allows the camera to "settle" after your hand pushed the shutter button.
You will be amazed at the improvements in your images from just taking the advice given in these few posts. There are more ideas to come. If you have a winning photo set-up, bring it on! Just use the initial post as your guide.
Remember, now, "film" is cheap.


 Previous Topic
 Index
Index