Clinton Knives dominionhobby.com
The RANDALL KNIFE FORUMS

A place where EVERYBODY is welcome to join in on the discussion of Randall Made knives


Page 1 of 15 1 2 3 ... 14 15 >
Topic Options
Rate This Topic
#125518 - 03/24/15 12:38 AM Any In The Closet Randall Knife Customizers Here? *
Joe Tousignant Offline
Knife Enthusiast

Registered: 06/20/14
Posts: 90
Loc: Upstate New York
I was wondering if anyone here is in the closet,....the "I customized/altered my Randall" Model *-* closet???

This is not so much about professional engraving, as that is generally not changing the mechanics or design of the knife,....just the cosmetic beauty,....and is not likely to be done by the owner. It's also quite accepted and not likely to be an issue with the strictly collector types.

So you made changes to an intended user or EDC knife,... BECAUSE either Randall doesn't make the model you desire (such as a thinner bladed "Bushcraft" style model),....No the Model 28 Woodsman is still too fat and the grind not what I'd like,....and,...um....I'd prefer no choil.

....or you have a model that you like overall, but still has issues that changes you made would make it better for your intended purposes?

I realize some here will cringe as such a thought,....but I doubt Bo wouldn't mind were he still around,..."IF" you would actually USE more of his Knives! The sheer number and variety of Randall offering shows he was open to new ideas,....else we'd have just ONE style Randall. :-) (and no limited editions or minatures either)

So,....while I have several Randall's I will never make changes on,.....I have a few I've added a well positioned thong hole on (two Model 26 Pathfinders with brass butts/pommels),...and one of those I worked on the blade to make it a better (for "me") woods and food prep knife. 3/16th inch is just too thick for my preferences.

Please keep this friendly,...even if you don't agree with customizations. If you'll carry and actually USE at least ONE Randall regularly,....I think the big man upstairs is smiling.

Just PLEASE,.....NO BLACK SPACERS! As the Captain pointed out in a thread I came across recently,..."Black spacers are NAZI COLORS", and Bo wouldn't do it on ANY blade leaving his shop! Red, White, and Blue spacers only!

So you show me yours,.....and I'll show you mine! (Original warranty be damned! laugh )


Edited by Joe Tousignant (03/24/15 01:08 AM)

Top
#125530 - 03/24/15 09:40 AM Re: Any In The Closet Randall Knife Customizers Here? [Re: Joe Tousignant]
desert.snake Offline
Knife Enthusiast

Registered: 09/25/13
Posts: 1115
Loc: the other side of the earth
I just ordered a 8-4 with pure black spacers)))

By the way, the Nazi flag is not black, it is a red cloth, in the center of the white circle and a black swastika))
Swastika a symbol of life, the sun. Germans put it on their flag and went against swastika values, they carried destruction.
Inconsistency proclaimed values and actually perpetrated cases leads to punishment from higher forces.
Therefore, they were doomed to defeat originally. We conquered them and destroyed.

If you look for associations with color spacers, the black is more suitable to the pirate flag.
For example flag Jack Rackham and other pirates
(Jolly Roger/Old Roger) smile


It has no relation to the Randall knives.
If a man wears a black tie, he is also a secret admirer of the Nazi ?))


As for the topic itself, I have a few ideas that could be improved, such as the thickness of the blade in some cases it was possible to make a 2.5-3 mm, instead of 1/4".
Or models, if set reduced hilt, then reduce choil or just do removed it up)

I think Bo, Gary and other developers have managed to find a very successful form of design to meet specific needs most users.
Certainly, every person has some thoughts on upgrading his instrument personally for themselves. Therefore, proposals may be millions variants.
With regard to China and India - billions smile smile


Attachments
------Old Roger.jpg

------Randall #4-4 reduced choil.jpg


_________________________
Si vis pacem, para bellum

Top
#125531 - 03/24/15 09:54 AM Re: Any In The Closet Randall Knife Customizers Here? [Re: Joe Tousignant]
TAH Offline
Knife Enthusiast

Registered: 10/26/05
Posts: 2382
Loc: USA
Originally Posted By: Joe Tousignant
I was wondering if anyone here is in the closet,....the "I customized/altered my Randall" Model *-* closet???


I haven't, but here's one I saw on another forum.

_________________________
Tom
RKS #4233

Top
#125535 - 03/24/15 10:42 AM Re: Any In The Closet Randall Knife Customizers Here? [Re: TAH]
Captain Chris Stanaback Online
Knife Enthusiast

Registered: 09/14/05
Posts: 12689
Loc: Central Florida
Black spacers are available from Randall and have been for a couple of decades or better. The quote, from Bo Randall, was in the Randall shop, circa 1980-ish.
Best, Capt. Chris
_________________________
Capt.Chris Stanaback
RKCC/RKCA Founder
RKS #016
NRA Lifetime Member
CAPTSTANABACK@aol.com
WEBSITE: www.captstanaback.com

Top
#125538 - 03/24/15 12:43 PM Re: Any In The Closet Randall Knife Customizers Here? [Re: Captain Chris Stanaback]
Joe Tousignant Offline
Knife Enthusiast

Registered: 06/20/14
Posts: 90
Loc: Upstate New York
Yes,...I believe I've seen several Randall's with black spacers,...just joking a bit in keeping with the spirit of "da man". laugh


Ok,...this is a Model 26 I received about a year ago. The reduced hilt sort of reminded me of a glorified steak knife, and it arrived in a pouch Randall sheath without the usual strap.

The stag is a "meaty" example offering very good grip, even when wet because of the many raised bumps in the stag. (but not so high as to be uncomfortable)

Here's how it looked before some changes were made:


The choil is somewhat less than on my other Model 26's, but not as much as is shown in the post above. The stag handle is basically a Model 25 but without any leather spacers.

I've been wanting a thinner bladed version of this for better control in woodcraft/bushcraft duties,....as well as better slicing in food prep. The 3/16" spine puts the edge at a steeper angle than I prefer when cutting into wood and making feathersticks, and the abrupt termination of the grind doesn't help when slicing hard vegetables.

The actual edge was also much too delicate for woodworking,....as it had very thin and short secondary bevel. This had a great edge originally for cleaning game, which it was designed for I suppose, but I'd worry about rolling or chipping an edge for bushcraft duties.


This example also had a fairly deep stamping, which would be necessary to thin the blade and have a full stamp remaining. I dulled the edge before working on it, since I was planning on putting on a thicker edge anyway. This made it safer to work with without taping up the edge,...which would get in the way for the project.

I didn't know how thin I could go, but started with a 1/2" drum sander, 60 grit,....and worked JUST the stamped side until I got close. Then went to 120 and later 240 grit,....then hand sanding with a wooden block and 600 grit to 1500 grit,.....and using a jewelers polishing rag by hand imparted a near mirror finish.

This allowed me to use my dial calipers to make sure I was grinding parallel to the untouched side. I also took a measurement of the thickness before I started. I took another thickness measurement to see how much thickness I had removed from just the one side. This gave me a number to remove from the other side to even it all up.

In the end I ended up with a noticeably thinner blade, that smoothly tappers from .141" (9/64") at the Randall stamp area to about .10" nearing the tip. (stock was .1875" , aka 3/16", or 12/64" with smoother tapering toward the tip.

The blade is about 25% thinner, about all I could do and be sure of the full Randall stamp remaining. The shallower stamp should prove easier to clean out and dry, especially on a carbon blade like this.


I also rounded up the "peaked" shape of the reduced hilt,...as it was uncomfortable when I chocked up to that area. Now I can grip right up over the choil area to make use of all the cutting edge. The noticeably shorter choil on the worked on Model 26 is also seen....


A few more....


The stamp is full,...but of course not as deep:


Thong hole added:


You can see just how "meaty" this handle is, compared to my other Model 26 with 25 handle. Notice the raised bumps for gripping advantage, especially when wet. With no guard and working near the edge, that is "helpful". laugh


I made use of a tighter fitting Billy Watson sheath which covers more of the stag and is much tighter fit. This is my most practical EDC, although the Model 1-7 Kit knife I posted recently was been traveling with me of late. This is a much lighter rig, using 5/8" litago leather straps.


I took the sheath apart, and brought more of the upper section down and sewed in a smaller upper slot to fit the 5/8" strap. It stays put when wearing,....the Chicago Screws have a raised top and bottom, retaining the sheath on the channel. There is a full size belt loop further down out of sight in this picture that will allow "Hi-Ride" belt carry. I prefer the harness, however. The lower belt loop area could fit a removable leather fire steel holder when I get around to it.


Edited by Joe Tousignant (03/24/15 06:48 PM)

Top
#125542 - 03/24/15 01:39 PM Re: Any In The Closet Randall Knife Customizers Here? [Re: Joe Tousignant]
desert.snake Offline
Knife Enthusiast

Registered: 09/25/13
Posts: 1115
Loc: the other side of the earth
Cool happened! smile
Strap glows in the dark or just a bright color?)
_________________________
Si vis pacem, para bellum

Top
#125559 - 03/24/15 06:02 PM Re: Any In The Closet Randall Knife Customizers Here? [Re: desert.snake]
Chief Offline
Knife Enthusiast

Registered: 12/05/05
Posts: 5413
Loc: Baton Rouge, Louisiana
I've never messed with the "blade" but have picked up a few knives that someone supplied the handle material for "not the shop supplied".
Then went what was I thinking. I had James Behring re handle them. Came out nice!
_________________________
See Ya, Chief
RKCC CM-037
RKS #5154

If you put off following The LORD just remember......They don't serve breakfast in hell!

Top
#125563 - 03/24/15 06:24 PM Re: Any In The Closet Randall Knife Customizers Here? [Re: desert.snake]
Joe Tousignant Offline
Knife Enthusiast

Registered: 06/20/14
Posts: 90
Loc: Upstate New York
Originally Posted By: desert.snake
Cool happened! smile
Strap glows in the dark or just a bright color?)


No glow in the dark thong strap,....but it is bright to see in the woods if I lay it down. I couldn't find bright orange paracord,....but this is pretty close in visability laugh


Edited by Joe Tousignant (03/24/15 06:27 PM)

Top
#125624 - 03/26/15 04:45 AM Re: Any In The Closet Randall Knife Customizers Here? [Re: Joe Tousignant]
Shelley Offline
Knife Enthusiast

Registered: 05/31/14
Posts: 144
Loc: New Zealand
Hey Joe, you are a brave man...but the strap thingy for carrying, could you give us a rundown on how you made that please, I think it's very nice and may give it a shot. Cheers.

Top
#125638 - 03/26/15 01:05 PM Re: Any In The Closet Randall Knife Customizers Here? [Re: Shelley]
Joe Tousignant Offline
Knife Enthusiast

Registered: 06/20/14
Posts: 90
Loc: Upstate New York
Originally Posted By: Shelley
Hey Joe, you are a brave man...but the strap thingy for carrying, could you give us a rundown on how you made that please, I think it's very nice and may give it a shot. Cheers.


Hi,...thanks, I've never been one to just "collect", and have others actually get to USE and enjoy an item I care about once I'm gone! We're not here that long. A Randall knife was really meant to be a useful and enjoyable tool first. I can say it's definitely more enjoyable as a user, even if it's only one or two from of your "collection".! laugh


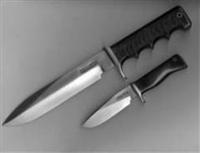
OK,....I think the pictures provided pretty much show how this can be assembled, but I'll add some details that might help you. For this harness involving an average sized EDC style knife, I used 5/8" wide "latigo leather, total piece length of about 50 inches should do.

Chicago screws were of the 1/4 inch post length size, which allowed a close fit to the double thickness of the leather straps being joined, yet had a little free play to "self adjust" the angles of the strap connections if needed when wearing. I fashioned about a 6 inch long shoulder pad section, that I cut 2 slots in to feed the main strap.( 1.5 inch width from an old belt bought at Salvation army for $2.00) This pad spreads the weight of the knife over a wider area of the shoulder, and aids in keeping it in place. It always shifts a little over time, but not much with the pad. it's better to fit this pad to a friction fit to the main strap, as it will stay in place that way.

This latigo leather is the more pliable variety of leather and holds up better outdoors, as it feels a bit "oily" to me when cutting pieces. Nothing noticeable when wearing however. Horse saddle straps are a prime use for this type of leather. It's also very comfortable for us humans to "wear" :-) I got mine on ebay doing a search, but I'm sure saddle supply houses carry it.

The longest piece that fits me well and allows for some adjustment measured 42 inches, the section going thru the sheath 3.5 inches (adjust to your sheath loop width, PLUS add about 1 inch to each side for the connections). The leather strip with this buckle attached is about 5 inches (a bit longer would be better as I found out, see "In Hindsight" comments below).

This allowed the buckle connection to be folded over and riveted, as well as for the buckle to come away from the sheath a little so that any excess strap adjustment length doesn't bump up against the sheath.

I like a little extra adjustment built in, just in case I ever want to wear this in the woods OVER a jacket. However, I like grabbing a warm knife so it's probably never going to get used that way. :-)

You'll also need a matching 5/8" width buckle with the built in "keeper" loop. This will keep the loose end of the adjustable portion of the main strap a bit under control, but mainly it keeps the strap sort of locked into the buckle.

I used this buckle (link) off an extra strap off I had bought from Rivendell Bicycle Works.

I cut it out of this strap,....

http://www.rivbike.com/product-p/bs7.htm

...... BUT IN HINDSIGHT you could simply USE the entire strap/buckle as is, and attach to one section of the short piece going thru the sheath, using Chicago Screws. I like to use Loctite, (medium strength "blue" color is sufficient), on the treads once you've test fitted everything.

I'd use the outermost hole to attach and trim the excess off the end, (or punch another hole near the end)...so that maybe an inch or so "tail" sticks out to not interfere with the connection with the section going thru the sheath.

I should have made a little longer "buckle section" for when I have a knife I want to carry higher. Mine has a working length of just 4" (1 inch was used to add a slot to fold over the buckle and rivet), so when I want to adjust higher the excess flap out the buckle will contact the sheath and bunch up a little. Using this full length 7" strap will avoid the bunching. You will probably have to use leather dye on this 7" strap, as they come natural color. (which is why I cut it out and fit it to a piece of the main strap)


Because I was retrofitting a sheath I had available, I took it apart so that I could bring the belt strap loop further back to allow both a regular belt "high ride carry" connection point (out of frame in this pic below),....but also a smaller width strap position as I am using and shown here for use in a harness. The lower belt loop might be used to add a removable strap fitted to hold a fire steel, which I may work on soon.

I did this mainly so that the sheath stays put without need for any additional ties to keep it centered on the strap area between the 2 "Chicago Screws? connecting the main strap to the small piece going thru the sheath. These Chicago screws (or rivits and burs if you prefer but a bit harder to install),....are best fitted a little "loose", to allow the strap ends to pivot as needed while wearing.

The angle of the main strap connections, combined with the smaller loop width I sewed in, keep the sheath in place between the screws without any additional means on the 5/8" small section going thru the sheath.

You can easily use most any standard sheath, and use a wider and possibly thicker section. Sewing two wider pieces together would give you a tighter fit into a standard sheath. This would match the belt loop area you have available.

You can also just punch two 1/8" or so holes on either side of the small leather section going thru the sheath, and attach a small piece of paracord effectively locking the sheath centered on this area. I didn't need to do this because of the already tighter fit I achieved by sewing in the smaller loop area on the sheath.

I used a Tandy leather 1/8" hole punch for the strap adjustment holes and Chicago screw rivets. This works great for the buckle adjustments, BUT is a little small for the Chicago screws. However, once punched the holes can be reamed out larger enough to fit with anything handy of the right diameter. (a nail even) I just didn't have a larger punch handy,...so made do.

Anyway, good luck on your project.

In case you're wondering what advantage adding connecting sections hold over just using a "one piece" leather strap would do,...it allows the sheath AND strap sections to lay FLAT against your body. A one piece strap will buckle out in places, and not near as comfortable to wear.

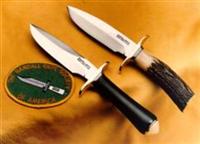
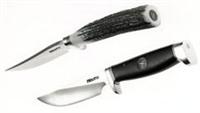
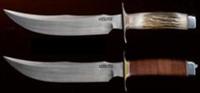
I'll add just a few of the pictures already posted to keep these details close to visual aids. laugh


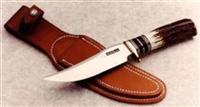
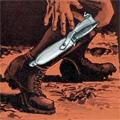
You can see here why I'd prefer a little longer buckle section, which would move the buckle further from the sheath yet still be convenient to reach to make adjustments.

I don't particularly like the strap end bunching into the sheath like this. If I shorten the strap end and remove a few adjustment holes, it may not be adjustable to wear over a jacket in winter.

In the end I'll probably locate a bit longer 5/8" strap section, and replace just that piece. I'll also have to remove a similar amount (off the additional length added) from the other side of sheath connection, to keep the overall length the same.


Edited by Joe Tousignant (03/26/15 01:29 PM)

Top
Page 1 of 15 1 2 3 ... 14 15 >


Moderator:  Mr_Mod