Clinton Knives dominionhobby.com
The RANDALL KNIFE FORUMS

A place where EVERYBODY is welcome to join in on the discussion of Randall Made knives


Page 4 of 6 < 1 2 3 4 5 6 >
Topic Options
Rate This Topic
#145627 - 07/25/16 11:56 AM Re: How to Improve Your Knife Photos ** [Re: Captain Chris Stanaback]
BladesNBarrels Offline
Knife Enthusiast

Registered: 09/19/05
Posts: 1357
Loc: East Tincup General Store,Colo...
Originally Posted By: Captain Chris Stanaback
Shot a few minutes ago, with the help of Mother Nature.


That pesky Mother Nature sure gets around!


Attachments
------mother-nature.jpg


_________________________
David Loomis
RKS# 724
RKCC# CM-061
Molon Labe

Top
#151614 - 10/17/16 10:16 PM Re: How to Improve Your Knife Photos [Re: Captain Chris Stanaback]
Ausblade Offline
Knife Enthusiast

Registered: 03/29/06
Posts: 397
Loc: A land downunder
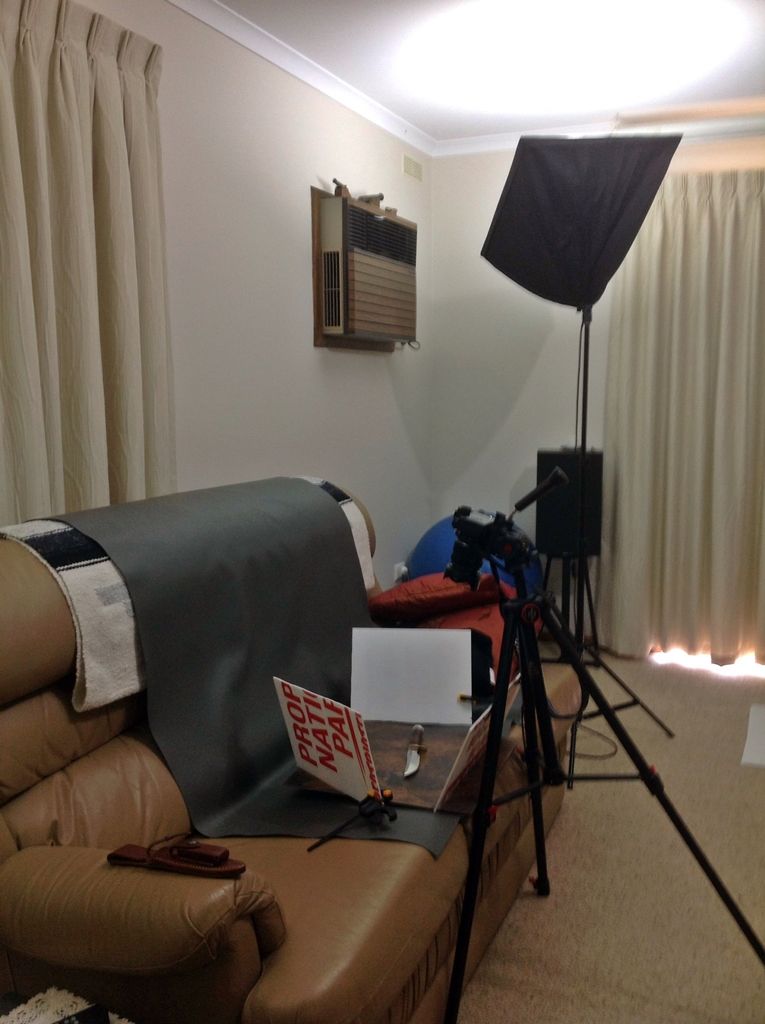
Neat setup Capt. Chris.
Five lights seems like a lot of wattage to me. Do you have much trouble avoiding reflection from the blade?

I've changed my set up since my previous post in this thread.
My old water and shock proof point and shoot Olympus got dropped once too often. I went and bough another (Olympus TG-4) but while I was in the shop got talked into buying an Olympus OM-D EM5 MkII as well. It overbalances my little Manfrotto tripod, so I dug out my dads old video camera tripod.

Now the new OM-D is only an 4/3 amateur camera but it has far too many controls for me and it takes so long for me to it get set right, that my smart phone and iPad light apps usually turn themselves off. Also I need the IPad to wirelessly control the camera. So a new lighting setup is required. It is not finalised yet but I know what will work.

I purchase a couple of LED cool while 50W flood globes and put them in desk lamps pointed up into two corners of the room. Kate wanted he desk lamps back so I borrowed a couple of cheap photo graphic soft boxes (same globes)until such time as I can find a couple of nice lamps I can leave in the room all the time.
My reflectors are old election advertising plastic signs and my backgrounds are vinyl floor tiles.


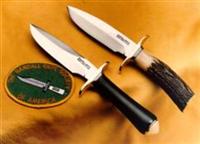
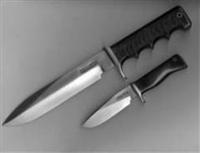
The knife photo was shot with the camera, lens, tripod and set-up listed below:
Camera: Olympus OM-D EM-5 MK. II (4/3 format digital SLR)
Lens: Olympus M.Zuiko OMD 12-40mm f2.8 PRO
Wirelessly tethered to IPad
Tripod: No Name
White balance: Auto
F-stop: f11
ASA/ISO 200
LIGHTS: 2 x 5300K Cree LED 50W reflected off ceiling in a dark room.

_________________________
Graham

Top
#151656 - 10/18/16 12:22 PM Re: How to Improve Your Knife Photos [Re: Ausblade]
Captain Chris Stanaback Offline
Knife Enthusiast

Registered: 09/14/05
Posts: 12675
Loc: Central Florida
Graham,
Actually, I am using "7" 5200K's. That is down by 4 from my all-time high of "11"! I like your knife photo, very much. Maybe, if I knew what the hell I was doing, I could save electricity too!
Best, Capt. Chris


Edited by Captain Chris Stanaback (10/18/16 01:19 PM)
_________________________
Capt.Chris Stanaback
RKCC/RKCA Founder
RKS #016
NRA Lifetime Member
CAPTSTANABACK@aol.com
WEBSITE: www.captstanaback.com

Top
#151681 - 10/18/16 05:46 PM Re: How to Improve Your Knife Photos [Re: Captain Chris Stanaback]
Ausblade Offline
Knife Enthusiast

Registered: 03/29/06
Posts: 397
Loc: A land downunder
I don't claim to know what I'm doing. I just know what works for me. Knives are my hobby not photography and I will never get to the stage of buying a professional camera. I went to buy a new compact travel camera and my wife suggested we get a replacement for our old EOS-300 DSLR at the same time. I even down graded the DSLR requirement to a compact mirrorless DSLR, because if it is going to be used, it has to fit in my travel bag or hunting pack.

I have found that my better photos are taken around midday on very cloudy, even stormy days. So obviously intense light is not required. By using a tripod and long exposures (3-6 seconds) I don't need much light, just even light. Reflecting the light off two corners of the room gives me light from 6 direction. Then with up to 4 adjustable reflector panels around the knife I can minimise the shadows.

Shooting tethered to my IPad has been a great advantage to me. My short range vision is getting really bad so moving from the little 2" LCD on the camera to a 9" IPad means I can be more accurate checking that the focusing is on the knife and not the background.

My new point and shoot has this facility also, so I might go back to using the simpler camera, after all we are only taking pictures for the internet not the front page of a glossy magazine.
_________________________
Graham

Top
#151683 - 10/18/16 05:59 PM Re: How to Improve Your Knife Photos [Re: Ausblade]
Captain Chris Stanaback Offline
Knife Enthusiast

Registered: 09/14/05
Posts: 12675
Loc: Central Florida
I may use a good many lights..."but"...(I feel better already)...they are "triple-filtered"! One photo tent, inside of a larger photo tent and white photo-grade muslin cloth over each individual light. Angling the blade, just right, allows for proper reflection...in many cases. Of course, I have "my days" when it doesn't matter what in the hell I do...the shots just don't seem to work out well.
I agree with you about the overcast days. I took the photo below, outside, with no direct sunlight overhead..."&" a photo tent. This is the #3-5" that the Randall shop put "on-loan" for me to be able to complete a story I'm working on.
Best, Capt. Chris
PS: #3, in thuya burl...Tomahawks by RW Wilson. RW made all of the knives and tomahawks for the movie, "Jeremiah Johnson". I'm proud to own these two...CCS


Attachments
------Thuya Burl #3-5-D.JPG


Edited by Captain Chris Stanaback (10/18/16 06:01 PM)
_________________________
Capt.Chris Stanaback
RKCC/RKCA Founder
RKS #016
NRA Lifetime Member
CAPTSTANABACK@aol.com
WEBSITE: www.captstanaback.com

Top
#151688 - 10/18/16 06:55 PM Re: How to Improve Your Knife Photos [Re: Captain Chris Stanaback]
RamKingJC Offline
Knife Enthusiast

Registered: 09/12/15
Posts: 3066
What's the story called... " Trapped in the "Stash" ."
grin


Edited by RamKingJC (10/18/16 06:56 PM)
_________________________
James Caruso
RKCC #CM008
rugermark2jc@gmail.com

"First comes smiles, then lies. Last is gunfire."

Top
#151691 - 10/18/16 07:42 PM Re: How to Improve Your Knife Photos [Re: Captain Chris Stanaback]
Chief Offline
Knife Enthusiast

Registered: 12/05/05
Posts: 5413
Loc: Baton Rouge, Louisiana
Originally Posted By: Captain Chris Stanaback

Best, Capt. Chris
PS: #3, in thuya burl...Tomahawks by RW Wilson. RW made all of the knives and tomahawks for the movie, "Jeremiah Johnson". I'm proud to own these two...CCS


Very sexy, LOVE the "Hawks Bro!!!!!
_________________________
See Ya, Chief
RKCC CM-037
RKS #5154

If you put off following The LORD just remember......They don't serve breakfast in hell!

Top
#151696 - 10/18/16 08:15 PM Re: How to Improve Your Knife Photos [Re: Chief]
W Polidori Offline
Knife Enthusiast

Registered: 02/09/16
Posts: 5791
Loc: Central New York
Graham,

Nice to see you posting again. Hope you and Kate are well. Please stop in more often, you are missed buddy.
_________________________
Warren

Top
#151697 - 10/18/16 08:35 PM Re: How to Improve Your Knife Photos [Re: W Polidori]
W Polidori Offline
Knife Enthusiast

Registered: 02/09/16
Posts: 5791
Loc: Central New York
Oh and a follow -up to my last post, nice pic. I'm with you Graham, I don't invest in alot of photo stuff. You can do alot with a little and still get good results. You can do wonders with inexpensive white board. Once you figure it out, it starts to make sense and you build on that. I've also purchased several inexpensive white photo umbrellas that work quite well.
Key is white reflective material to wash out hot spots.
_________________________
Warren

Top
#158346 - 03/21/17 04:56 PM Re: How to Improve Your Knife Photos [Re: W Polidori]
Boomer51 Offline
Knife Enthusiast

Registered: 11/06/16
Posts: 353
Loc: Tennessee
I used the link that Tony provided early in this thread and made that field expedient light tent - it's actually not bad. I'm no shutterbug but at least the photos I have now are better than the earlier ones so I'll call it improvement..

The instructions are pretty easy, I put it together in about 30 minutes and mostly used materials on hand. I bought the fabric and different colored cardboard sheets so I'm out $4.75 on the whole setup. I had the clamp on light already (3 way 30-70-100W cool white bulb)and used the tripod off one of my spotting scopes for the camera.
The box I used was a 16x16 and it works ok for up to 8" blades - anything longer than that and you'll need a bigger box.

The camera is just a point/shoot Nikon 14 mega pixel set on ISO 100 / Auto white balance / flash off / 2 second timer (I honestly don't know what the rest of that stuff on the menu means).

Here are a couple photos of the rig and photos I have taken with it. For guys like me that don't take a lot of photos it's not a bad setup - not as good as the pros on here but it works. I still need to play with the lighting some more and try some different backgrounds. The best part is that's it's very portable, the small box just goes in the closet on the shelf and it's done.


Attachments
------photo rig.JPG

------photo rig.b.JPG

------photo rig.c.JPG

------DSCN5220.JPG

------photo rig.d.JPG


_________________________
Dwight


Top
Page 4 of 6 < 1 2 3 4 5 6 >


Moderator:  Mr_Mod