How to Improve Your Knife Photos
Posted by: Buck Buchanan
How to Improve Your Knife Photos - 07/02/15 09:34 PM
--An Invitation--
Subject: An Invitation to contribute & share your photography expertise.
I invite you to help folks on the Forum to improve their photographic skills. This will be a sticky thread to stay as a reference in the Picture gallery, called How to Improve Your Knife Photos.
The format is simple: Two or more photos & your set-up description
1. Brief description of your studio set-up
2. Image(s) #1(or more) will be photo(s) of your studio set-up with or without the knife.
3. Last image will be the finished photo of a Randall knife you photographed using your set-up.
1. Description of the studio set-up & 2. Photo(s) of studio set-up
Describe any major hand-made items, like a light-box. Tony offered a link to a website to construct one. If you are describing factory-made equipment, like a light-box/tent, or lighting, indicate manufacturer, model, and mfg stock number & source. For example, I use the Lastolite Outdoor Cubelite, 3, Mfg #LL LR3687, from B & H Photo or I use 400 watt incandescent bulbs with clamp-on fixtures from Wal-Mart. It also can be as simple as saying, I shot this outdoors on an overcast day, eliminating shadows from the knife & sheath in the photo.
Camera description (Optional):
If you are using a SLR, make, model, and lens. Example: Canon 5D MKII, Canon 100mm macro f/2.8 lens. If a zoom lens is used, indicate the focal length for the shot. For example, Canon 70-200 f/4 lens@ 100mm. If not a SLR, indicate camera make & model, and focal length used for the shot. If you are using a smartphone, indicate make and model. They are getting better and better.
3. Indicate with the last image of the knife, the camera settings. (Knife Photo)
If the camera setting information is available, indicate the following with the knife photo:
ISO, shutter speed, & aperture. An alternative location would be in the File Caption Block of knife image in the File Manager. For example, Randall Model 1-7: ISO 100, 1/5 sec @ f/22.
Lastly, indicate photo-editing app you are using, if any. Example: Photoshop Elements, Version 12 or on my iPad & iPhone, I use Snapseed, a free app from Google.
I want to see both the simple set-up, costing less than $100, and the semi-pro set-up with light stands, and light tent/box like Captain Chris uses, and everything in between, including smartphone photography.
Your contribution will be beneficial to readers who would like to refine their posting entries.
As images improve, the KTF improves as well. I hope you will join me in this educational endeavor by providing your expertise to help enhance our website.
Ive asked Mitchell Harrison to start by showing one example of how to proceed. Some of our regulars have been ask to contribute their set-up.
I appreciate your efforts in gathering images and descriptions to make this a success.
Posted by: tunefink
Re: How to Improve Your Knife Photos - 07/03/15 10:36 AM
My camera is a Nikon D700. I use a Nikkor 35-70mm f2.8 lens for most of my shots. It is tack sharp and fast. I used a cable shutter release.... you can use a timer as well.
My camera settings are:
Large Jpeg Format
Spot focus - I always try to get the logo or the hilt in the spot for a sharp picture.
Aperture Priority - usually f8 to f11. This provides good depth of field. Adjust shutter to control exposure.
ISO is 200
White Balance is 3000k which matches the lighting
I use Lightroom photo software
I used to set up and take down my studio which included three lights on stands and a tripod for the camera..... and a table for the light tent. It took up a lot of room and was a pain in the ass. Here is a picture of my old rig:

So, I decided to make something I could leave around all the time. It is smaller in footprint and is on wheels, so I can roll it to a corner when not in use.
Starting at the bottom - It was an old cart that came from Sam's I think. I cut the height down and attached a wood top. Any rolling table will work.
Any light tent will work.... Mine is 24" x 24" x 36"
Instead of a tripod, I bought a computer monitor mounting arm from Amazon and attached a tripod ball head to it. It swings in and out of the light tent opening and is pretty steady.
I attached a second arm to hols my PC. I shoot "tethered" which means the camera is connected to the PC and the pictures appear on the monitor right after you take them. It allows for easy review.
I use 3 Cree LED flood lights. They are 18W, 3000K. I mounted them to three bar clamps I bought at Lowes. The bar clamps made it easy to attach the lights to the wood top and made for a very narrow footprint.
I added a power strip to the table so all the cords are zip tied and there is only one plug that needs to go to the wall.


Here is a shot I took at these settings:

Let me know if you have any questions.......thanks for starting this Buck!!!
Posted by: Buck Buchanan
Re: How to Improve Your Knife Photos - 07/03/15 11:39 AM
Excellent post, Mitchell. I am going to use your method to reduce my light tent set-up.
See how ideas help each other to improve. It's already doing what it intended to do.
Thanks,
Buck
Posted by: TonyLaPetri
Re: How to Improve Your Knife Photos - 07/03/15 09:55 PM
Here is a link to a cool site ...
http://digital-photography-school.com/how-to-make-a-inexpensive-light-tent/It shows how to make an inexpensive light box/tent from a big box.
I did this using a box that a TV came in.
And I not only use a light (just a desk/drawing table lamp) on top but often use
two others, one on the left and one on the right to bring in some directional light
that can give more definition to the blade grind lines.
I have a tripod and use just a digital point and shoot ... a little Canon or a small Sony...
but just a point and shoot. Also you can add different color papers or fabric for the backgrounds.
Here are some photos I took using this inexpensive/homemade set up and a simple point and shoot digital camera.
Oh ... The fabric I used on the light box was not fabric but cut up white plastic trash bags.
Posted by: TonyLaPetri
Re: How to Improve Your Knife Photos - 07/03/15 10:07 PM
Hey Tune,
Great idea with the rolling cart!
I may incorporate it with my set up!
Posted by: TonyLaPetri
Re: How to Improve Your Knife Photos - 07/03/15 10:17 PM
Guys,
I'm also a big fan of taking photos in natural light ... outdoors.
I find the best light is when it's cloudy ... no hot spots / reflections from the bright sun.
Or ...
On a sunny day, set up the photo subject in shadow but literally just a few inches to a foot away
from the sun. this way you get the nice flat light of the shadow and the effect of the sun,
just several inches away.
Here is a shot I took on a cloudy day with some play sand and sea shells on my patio.
Posted by: Buck Buchanan
Re: How to Improve Your Knife Photos - 07/03/15 11:22 PM
Great photos, Tony. They look professional. This is an excellent lesson for anyone using a "point & shoot" camera (and an inexpensive set-up). I am looking forward to seeing more examples of outdoor shooting on an overcast day, even with a "smartphone".
It's a common result for folks to take a reflective item such as a knife and shoot indoors with a "smarthone" or a "point & shoot" camera, many times, unconsciously, with the flash mode on, washing out details in the subject.
This flash washout gets worse when one lays the knife and sheath on a shiny wood surface, and they can't understand why it's overexposed.
"Take It Outside On An Overcast Day"! Look at the detail in Tony's outdoor image.
Alternative backgrounds are wood decks, trees stumps, and an 18" square of linoleum tile with a textured or "wood" or "granite" pattern. The tile background make it appear as if the knife were shot inside on the floor. Outdoor overcast lighting will make a photo more acceptable & professional looking. This lighting IS hard to beat (& cheap, too).
To get really sharp images with a camera, set the aperture at f/8 or f/11 ( if you camera permits) and put the camera on a tripod. It doesn't matter whether the tripod cost $25 or $250, the camera becomes rock-solid. If you don't have a remote shutter release, use the camera's self-timer feature and set it for 5 or 10 seconds. This allows the camera to "settle" after your hand pushed the shutter button.
You will be amazed at the improvements in your images from just taking the advice given in these few posts. There are more ideas to come. If you have a winning photo set-up, bring it on! Just use the initial post as your guide.
Remember, now, "film" is cheap.

Posted by: Holzinger258
Re: How to Improve Your Knife Photos - 07/04/15 03:47 PM
I dont use an SLR.
I almost never make settings on my camera.
I dont use flash.
I dont use a tripod.
I dont use a light box.
I dont have a studio.
After many years becoming tired of lugging bags of SLR bodies, lenses, flash equipment, and tripods, I gave them all away several years ago. My son now happily takes pictures of my grandchildren with them. I own only one tiny pocket-size point-and-shoot camera (plus the camera on my iPhone). All my photos are taken hand-held. All the knife photos that I can remember were taken on the Auto setting. My studio is mostly outdoors on the patio, or the top of a block wall, as shown below. If its raining, I sometimes use a rug or bedspread indoors as my background. Here is a picture of my studio and a knife picture I just now took there.
Posted by: Holzinger258
Re: How to Improve Your Knife Photos - 07/04/15 03:48 PM
My camera is a Sony RX100 II. It measures only 1-1/2 x 2-1/4 x 4 inches. Two big advantages of this camera are: the size of its sensor, which is four times the size of the sensor in most point-and-shoot cameras; and its fast lens, which can open to f1.8 when not zoomed. You can get an idea of its size from the photo below.
BTW, since it is my only camera, I took the photo below with my iPhone in my other "studio"--the patio. I think its a pretty good photo for a phone camera, certainly good enough for posting to the forum.
Posted by: Holzinger258
Re: How to Improve Your Knife Photos - 07/04/15 03:51 PM
Though I havent been using a light box, I do have one, and am considering trying it out. I have a Digital Concepts Portable Lighting Studio which seems like it could do the job. It costs $59.00 on Amazon, includes two lights, a blue & gray background cloth, and some diffuser screens that can be configured with their velcro strips, and folds to 17 x 17 inches. Here are some pictures.
Posted by: Holzinger258
Re: How to Improve Your Knife Photos - 07/04/15 03:57 PM
A few things that help my results:
I try to shoot in the shade--best on an overcast day.
I take LOTS of photos, and choose the one(s) I want on my computer's big screen--NOT on my camera's tiny screen.
I view and edit photos using Photoshop Elements 12, and sometimes do a fair amount of adjusting.
Buck is absolutely right when he advises:
Try not to shoot with the flash mode on so you dont wash out details in the subject.
Try not to use a shiny surface as your background.
Shoot outside on an overcast day for best detail.
A tripod will help steady the camera.
and "film" is cheap.
Posted by: Billy Poyner
Re: How to Improve Your Knife Photos - 07/04/15 09:34 PM
I have no idea on the manufacturer of my light tent or lights as they were purchased from the Captain when he decided to upgrade.
Camera is a Canon T4I-New Lens recently Purchased Canon EF 24-150 mmF/4L.
Tripod is a Cullman.
Setting is F8 to F11--Iso is either 200 or 400.
I use Microsoft 2010.
Pictures to follow..
What I know is Thanks to Buck and Captain.
I'm glad this finally got going as I hope to get better.LIght tent is on my dining room table .At some point I plan on putting it in my spare room permantly
Thanks to everyone that has posted so far,
Posted by: Peter_Kaufman
Re: How to Improve Your Knife Photos - 07/05/15 01:23 PM
Great idea Buck
Here is my economy set up.
I have a Canon G10 compact high end camera (at the time) that was a hiking camera before the dust got into the lens. I sent it back for a new lens and now it is indoor only use.
I use manual settings and set the white balance for incandescent lights.
I made my "light box" out of 2x2 lumber, dowels and an old white sheet. I use the inexpensive clamp on lights found at most home improvement stores. Currently, I have a tile as the background on the bottom.
The software that I use in IrfanView which is a viewer program that allows one to optimize and resize among other things
http://www.irfanview.com/Here are photos of my setup, a Model 14 and the camera settings
Peter
Posted by: willhunt
Re: How to Improve Your Knife Photos - 02/24/16 03:08 PM
Mr. Buchanan was kind enough to lead me to this thread, so I'll post up how I take knife photos. I have been into photography for a long time, and most of this gear I did not buy specifically for knife photography. It is studio lighting and modifiers for portrait photography. But it turns out to work pretty well for both.
The flash head is an Einstein E640, with a Mola beauty dish installed on it. And I put a diffusion sock on the dish. I then shoot that through a translucent disk that is part of a Wescott 5-in-One Recflector kit. The intent is to spread the light out, make it softer, and provide a white material to reflect back off of the knife blade.
This shot was taken with a Canon 1DMkIV, 24-105 lens.
1/100 shutter speed, f/10 aperture, 200 ISO.
I use Photoshop CC to edit my photos, and consider some sort of photo editing software a MUST to get the most out of your knife pictures.
Well, here are the pics. Hope they help a little, and if there are any questions I'd be more than happy answer.
Posted by: Litch
Re: How to Improve Your Knife Photos - 03/26/16 06:18 PM
Maybe it's not very helpful to most of you but here is my setup anyway - my access to professional studio equipment helps a lot

The camera is a field camera Sinar p2 with 90mm or 150mm lenses by Rodenstock or Schneider and a 80MP digital back from PhaseOne.
For lighting I use a flash with two slim-lights and a board from the top that has a matte-silver cover. It is mounted on an extra stand so I can move it up and down and adjust the angle. The slim-lights reveal textures and create sharp outlines and the cardboard produces an even reflex on the blade with a nice hotspot. Sometimes I add an extra spotlight for even more texture or color.


Maybe that helps a little bit and Ill happily answer any questions
Posted by: BladesNBarrels
Re: How to Improve Your Knife Photos - 03/26/16 06:31 PM
Maybe that helps a little bit and Ill happily answer any questions
Wow!
Could you post the final picture of the knife, please?
Thanks,
Posted by: Litch
Re: How to Improve Your Knife Photos - 03/26/16 06:37 PM
Thanks, David. It's in the Model #8 thread:

Posted by: Ausblade
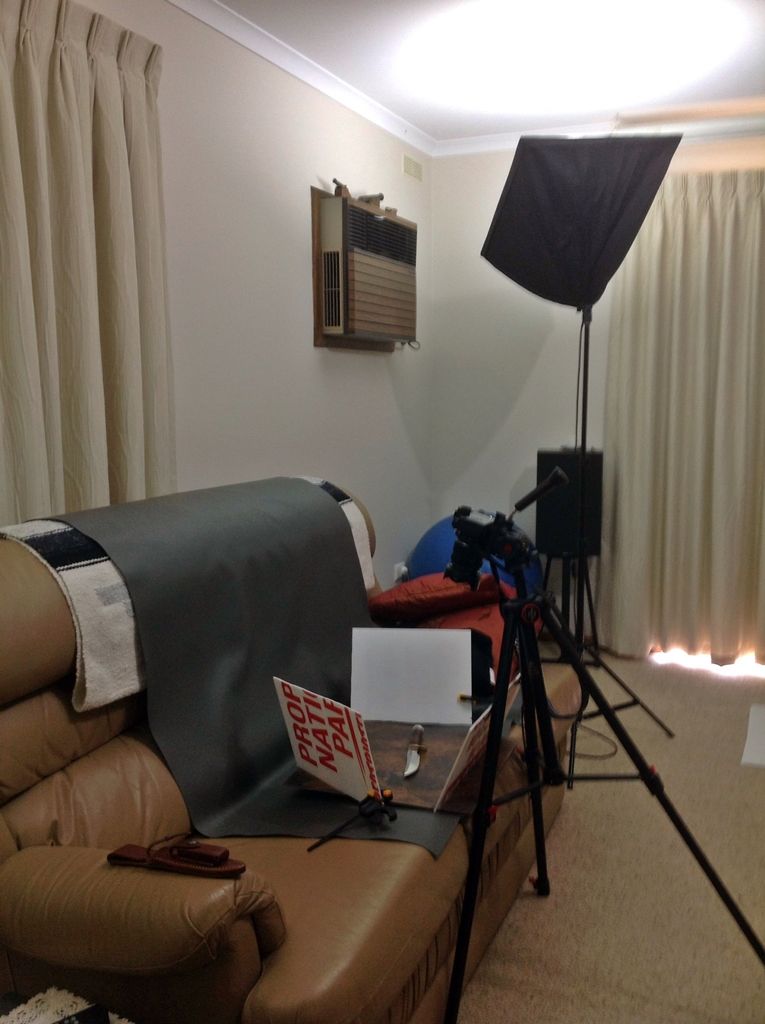
Re: How to Improve Your Knife Photos - 05/02/16 07:34 PM
This is probably going to get me laughed at, but here goes.
As a photographer I am a total novice, light boxes and fancy cameras are wasted on me, I would expect to get perfect result first off, or I would pack them away and never use them again.
My brother in law is a professional sports photographer so I asked him what I needed to take good photo's of knives. He replied with some indignation, that to post low resolution shots on the internet I needed nothing more than the equipment I had and good lighting. So here goes please try not to laugh.
Setup.
A piece of grey upholstery vinyl draped over the lounge room couch,
Light - Soft lighting app on up to 2 tablets and 3 phones but usually only use 2 as with this photo.
Camera
A point and shoot OLYMPUS u-TOUGH 8000 camera on a small tripod, set to manual, auto white balance, ISO 100, flash off, sometimes have to set to macro to get focus, use the timer so as not to bump the camera.
Other
Various white reflector cards and clamps. mostly I just hold them in my hand to get the right reflection on the blade.

Software
PhotoScape (freeware/Shareware)

Posted by: Zogger
Re: How to Improve Your Knife Photos - 05/02/16 07:38 PM
Ausblade: Actually that is a perfect setup!
Posted by: RamKingJC
Re: How to Improve Your Knife Photos - 05/02/16 07:44 PM
and it looks like it is working, Nuthin to laugh at here folks...
Posted by: pappy19
Re: How to Improve Your Knife Photos - 05/02/16 10:46 PM
Mine is Idaho sunlight on the dining room table with my Canon on close up. Not pretty but it works.
Pap
OK Buck...and "others",
I know it's been a long time coming but I will start to document my photo setup! I have put this project off for a number of reasons but the main one being: I have never been happy with my photo setup! I have been trying a lot of different approaches to this problem, including a prototype of what you are going to see below..."BUT"...(I know: That word again)...it was too friggin' big!
I prefer to have a more permanent setup that will allow a 30-32" photo tent. I have a decent size shop that serves my needs. I still need to use consideration for the overall size of a project, particularly the photo booth. I have decided to reduce the overall size to an interior of 25 1/2" / square! I contracted a 1" steel square-tubed frame to be built (again) using the outside dimensions of: 65 1/2" (tall) X 28 1/2" (wide) X 27" (deep).
The top and bottom will have plywood installed. The top piece will have a circular cutout to accommodate in light fixture. The bottom to be used as the floor for the bottom (storage) section. The 4 rails, welded on the inside will serve as:
A) Storage for my many and various backgrounds
B) Offering different heights to shoot subjects from
C) Be able to move subjects, in & out, like "drawers"
I think this setup will serve me long & well! The steel frame is rock-solid, has 4 "crutch tip" (rubber) feet, and doesn't budge, once set in place! It is still (fairly) portable, weighing only about 30 pounds (empty).
I'll post more photos as I continue to put this rig together. If anyone cares to respond, I would ask you hold off until the finished product is shown. That way, all of the photos will be order with no "gaps" in between. I have no idea how long everything will take...but I'm working on it!
Also: This photo booth will only serve useful for about 90% of my photo needs. To remedy the need for a larger booth I have sacrificed and inexpensive folding card table and cut the 5" off the tubular legs. This will give me a 24" high X 34" (square) top to shoot larger items, from a higher position. I will probably set this rig up outside, using a large piece of muslin cloth and Mother Nature as my "lighting"!
More to come...Capt. Chris
Bottom wood sections are cut and installed. The extreme bottom piece (We'll call it the "floor") is simple sanded 1/2" plywood. In order to fit it, I ripped it down the center, braced it underneath with a 2x3 and secured it well by drilling the steel tubing and screwing the whole mess down! It supports my weight, standing directly in the center of it. It is only going to be used for storage, etc...so we're "good-to-go"!
The next 2 sections up are simple wooden flooring underlament, about 1/4" stock. They will only be used to glue background material onto and no structural strength is really needed. You could use utility board (black or white) from Stales, etc. "BUT" (Had to get one in there) this stuff is $12.00 a 4" x 8" sheet. I get 3 sections out of it and the utility fiber boards run $5.00 each!
The next 2 sections are more 1/2" plywood as they will, not only hold background material but also Randall knives or whatever else I am photographing. I just feel more secure with a little more substance to these. Other background boards or material, layed on these loosely, will equally share this support.
....more to come, Capt. Chris
Let there be light! Well: at least "first" light. The roof is on the booth and a commercial reflector, along with a piece of photo/lighting cloth, has been installed in the roof. I use (either) Philips or Cree LED light bulbs with the following specs:
* "DAYLIGHT" specific lighting (usually "blue" printing)
* "L.E.D." lights
* "FLOOD" style.
* 5,000- 5,600K brightness
My camera is set to these settings in "WHITE BALANCE". I have used as many as 11 lights, at one time, especially when shooting after sunset. As you can (perhaps) see, I have some natural light that filters into my photo area and it definitely helps. I try to shoot as many photos during daylight hours as possible.
This setup, when finished should only require 3-5 lights. I have even painted the inside (underside) of the roof a semi-gloss bright white, as well as the metal framing in a satin white.
More to come...I am fading and want to watch the end of the race. (Jeff's driving @ Indy!)
Later, Capt. Chris
Posted by: RamKingJC
Re: How to Improve Your Knife Photos - 07/24/16 06:24 PM
VERY cool Capt.!
It's dark...but it's (sorta') finished! Only one background has been transferred over to the new plywood, but all of those transfers will probably take days! (ugh)...
So: The photo of the completed booth shows all 5 lights burning. The knife (Model #11-4 1/2" with dyed box elder) was photographed with the overhead light off. A lot of experimenting will be taking place over the next week or so, but you can see the setup. I have shot all of these "candids", off-hand with one of my other cameras: Canon EOS 60D.
The knife photo was shot with the camera, lens, tripod and set-up listed below:
Camera: Canon 5D MK. II (full format digital SLR)
Lens: Canon "L" series-(F-4) 24-70mm, set at 37mm for this shot
Tripod: Manfrotto Model 190XPROB
Grip: Manfrotto 322RC2, with swivel head
Setting: White balance: Daylight
F-stop: 5.6 (It is, after all nightfall!
ASA/ISO-400
LIGHTS: Overhead (not used in this shot) Cree 5000K
Side-lights: Philips 5200K
Both type of light bulbs, as listed before are:
* Flood type
* LED
* 65W-100W, depending upon Mfg.
Hope this was helpful to some of you. I plan on doing another "redneck tutorial" with "LESS"...a "LOT" less, with the sole intent in showing everyone how to take "1" photo of a knife, and successfully post it to the forum. For now....
Stay sharp, Capt. Chris
Posted by: BladesNBarrels
Re: How to Improve Your Knife Photos - 07/25/16 10:40 AM
Great construction Captain.
Do the plywood shelf units attach to the frame or slide in and out?
What provides the horizontal stability to prevent warping and twisting?
Thank you for the pictorial!
They slide. I have had no issues with them warping. Now the 1/4" floor laminate? Maybe. I'll have to see.
Best, Capt. Chris
Just for ref: Shot a few minutes ago, with the help of Mother Nature. ISO 800 with an F-stop of 14.
Best, Capt. Chris
RMK Model #4-5" with Musk Ox handle!
....and it's "still" too bright! (But you get the idea)
Capt. Chris
Posted by: BladesNBarrels
Re: How to Improve Your Knife Photos - 07/25/16 11:56 AM
Shot a few minutes ago, with the help of Mother Nature.
That pesky Mother Nature sure gets around!
Posted by: Ausblade
Re: How to Improve Your Knife Photos - 10/17/16 10:16 PM
Neat setup Capt. Chris.
Five lights seems like a lot of wattage to me. Do you have much trouble avoiding reflection from the blade?
I've changed my set up since my previous post in this thread.
My old water and shock proof point and shoot Olympus got dropped once too often. I went and bough another (Olympus TG-4) but while I was in the shop got talked into buying an Olympus OM-D EM5 MkII as well. It overbalances my little Manfrotto tripod, so I dug out my dads old video camera tripod.
Now the new OM-D is only an 4/3 amateur camera but it has far too many controls for me and it takes so long for me to it get set right, that my smart phone and iPad light apps usually turn themselves off. Also I need the IPad to wirelessly control the camera. So a new lighting setup is required. It is not finalised yet but I know what will work.
I purchase a couple of LED cool while 50W flood globes and put them in desk lamps pointed up into two corners of the room. Kate wanted he desk lamps back so I borrowed a couple of cheap photo graphic soft boxes (same globes)until such time as I can find a couple of nice lamps I can leave in the room all the time.
My reflectors are old election advertising plastic signs and my backgrounds are vinyl floor tiles.
The knife photo was shot with the camera, lens, tripod and set-up listed below:
Camera: Olympus OM-D EM-5 MK. II (4/3 format digital SLR)
Lens: Olympus M.Zuiko OMD 12-40mm f2.8 PRO
Wirelessly tethered to IPad
Tripod: No Name
White balance: Auto
F-stop: f11
ASA/ISO 200
LIGHTS: 2 x 5300K Cree LED 50W reflected off ceiling in a dark room.
Graham,
Actually, I am using "7" 5200K's. That is down by 4 from my all-time high of "11"! I like your knife photo, very much. Maybe, if I knew what the hell I was doing, I could save electricity too!
Best, Capt. Chris
Posted by: Ausblade
Re: How to Improve Your Knife Photos - 10/18/16 05:46 PM
I don't claim to know what I'm doing. I just know what works for me. Knives are my hobby not photography and I will never get to the stage of buying a professional camera. I went to buy a new compact travel camera and my wife suggested we get a replacement for our old EOS-300 DSLR at the same time. I even down graded the DSLR requirement to a compact mirrorless DSLR, because if it is going to be used, it has to fit in my travel bag or hunting pack.
I have found that my better photos are taken around midday on very cloudy, even stormy days. So obviously intense light is not required. By using a tripod and long exposures (3-6 seconds) I don't need much light, just even light. Reflecting the light off two corners of the room gives me light from 6 direction. Then with up to 4 adjustable reflector panels around the knife I can minimise the shadows.
Shooting tethered to my IPad has been a great advantage to me. My short range vision is getting really bad so moving from the little 2" LCD on the camera to a 9" IPad means I can be more accurate checking that the focusing is on the knife and not the background.
My new point and shoot has this facility also, so I might go back to using the simpler camera, after all we are only taking pictures for the internet not the front page of a glossy magazine.
I may use a good many lights..."but"...(I feel better already)...they are "triple-filtered"! One photo tent, inside of a larger photo tent and white photo-grade muslin cloth over each individual light. Angling the blade, just right, allows for proper reflection...in many cases. Of course, I have "my days" when it doesn't matter what in the hell I do...the shots just don't seem to work out well.
I agree with you about the overcast days. I took the photo below, outside, with no direct sunlight overhead..."&" a photo tent. This is the #3-5" that the Randall shop put "on-loan" for me to be able to complete a story I'm working on.
Best, Capt. Chris
PS: #3, in thuya burl...Tomahawks by RW Wilson. RW made all of the knives and tomahawks for the movie, "Jeremiah Johnson". I'm proud to own these two...CCS
Posted by: RamKingJC
Re: How to Improve Your Knife Photos - 10/18/16 06:55 PM
What's the story called... " Trapped in the "Stash" ."
Posted by: Chief
Re: How to Improve Your Knife Photos - 10/18/16 07:42 PM
Best, Capt. Chris
PS: #3, in thuya burl...Tomahawks by RW Wilson. RW made all of the knives and tomahawks for the movie, "Jeremiah Johnson". I'm proud to own these two...CCS
Very sexy, LOVE the "Hawks Bro!!!!!
Posted by: W Polidori
Re: How to Improve Your Knife Photos - 10/18/16 08:15 PM
Graham,
Nice to see you posting again. Hope you and Kate are well. Please stop in more often, you are missed buddy.
Posted by: W Polidori
Re: How to Improve Your Knife Photos - 10/18/16 08:35 PM
Oh and a follow -up to my last post, nice pic. I'm with you Graham, I don't invest in alot of photo stuff. You can do alot with a little and still get good results. You can do wonders with inexpensive white board. Once you figure it out, it starts to make sense and you build on that. I've also purchased several inexpensive white photo umbrellas that work quite well.
Key is white reflective material to wash out hot spots.
Posted by: Boomer51
Re: How to Improve Your Knife Photos - 03/21/17 04:56 PM
I used the link that Tony provided early in this thread and made that field expedient light tent - it's actually not bad. I'm no shutterbug but at least the photos I have now are better than the earlier ones so I'll call it improvement..
The instructions are pretty easy, I put it together in about 30 minutes and mostly used materials on hand. I bought the fabric and different colored cardboard sheets so I'm out $4.75 on the whole setup. I had the clamp on light already (3 way 30-70-100W cool white bulb)and used the tripod off one of my spotting scopes for the camera.
The box I used was a 16x16 and it works ok for up to 8" blades - anything longer than that and you'll need a bigger box.
The camera is just a point/shoot Nikon 14 mega pixel set on ISO 100 / Auto white balance / flash off / 2 second timer (I honestly don't know what the rest of that stuff on the menu means).
Here are a couple photos of the rig and photos I have taken with it. For guys like me that don't take a lot of photos it's not a bad setup - not as good as the pros on here but it works. I still need to play with the lighting some more and try some different backgrounds. The best part is that's it's very portable, the small box just goes in the closet on the shelf and it's done.
Posted by: TonyLaPetri
Re: How to Improve Your Knife Photos - 03/21/17 10:08 PM
Dwight,
Looking Good!
Another light on the side and something under the blade, like an artist's kneaded eraser or some kind of small piece of putty/clay, to angle the knife a little more towards the camera and the blade will be less "hot" and the grind lines more visable. Actually, the first shot is very good! You can see the grind lines better!
Tony
Posted by: Boomer51
Re: How to Improve Your Knife Photos - 03/21/17 10:43 PM
Appreciate the tips Tony - I'll try them out. Thanks for posting the light tent link.
D.
Posted by: Crutcher
Re: How to Improve Your Knife Photos - 03/26/17 09:15 PM
I've had a few compliments on my pictures. Thank you all.
Before we begin let me say that the pics are indeed pretty darn good but the con is that the free version of photobucket just doesn't seem to like my laptop or phone and shows a lot of ads. I do use the free version.
Thus far, I've used an older cell phone "Nokia 920 Lumia". Then I upload them to photobucket. After they're uploaded to photobucket I then....
1. click on my photo library on photobucket, click on the picture I want to add to the forum.
2. look to right of screen, I see 4 rectangular options to copy, copy the bottom one that says IMG and paste it to the forum...
That's it.. Obviously lighting and background scene and background layout can be important and can take some playing around with.
This phone as far as I know doesn't allow a lot of editing but the phone its self does allow you to change the lighting by viewing the photo and editing it, this can drastically improve and sometimes distort picture quality.
Posted by: Buck Buchanan
Re: How to Improve Your Knife Photos - 04/01/17 09:15 AM
Crutcher,
Check your App Store for your phone to download a free app called, "Snapseed" from Google.
It has many editing features to crop, rotate image, change light balance, add texture, and other possibilities right on your smartphone.
Did I mention, FREE?
Check it out. I use it on my iPhone 6.
Posted by: digi-shots
Re: How to Improve Your Knife Photos - 10/10/17 06:26 PM
Here's a photo I took just the other day... both knives belonged to an Army veteran who served in Vietnam.
Sometimes you can just get lucky with a shot, other times you can shoot, rearrange and shoot again and never really capture the right image. I think I got a little lucky with this one.... I used the bamboo to give a simple background and also a southeast-asia feel to the image.
I used a standard light tent - about 3' square. I keep the tent set up in the garage that has regular overhead fluorescent bulbs. However, my main light is two spot lights on small tripods - one on each side of the tent. This is a similar set up that most people use.
The lights can be aimed right at the subject or slightly upward. It really depends on what you're shooting.
For this shot, I used my cell phone, believe it or not! (iPhone 6) I have a very nice Canon camera and a heavy duty tripod that I usually use for nature shots, but my cell phone is proving a lot easier to use in the long run. I emailed the image to my computer and made minor adjustments. I cropped it a bit and darkened the overall lighting to make the black background go completely black - which hides the fabric pattern. My background is a piece of black fabric that is not very reflective.
One thing that helps with the cell phone - I shoot and then immediately review the shot. If it's not right, I adjust the lights or in this case, move the blade a bit to fix the reflection. Sometimes, the angle of the shot makes a difference... whether you shoot straight down or shoot from a lower position. I do like to "fill" the complete frame with whatever I'm shooting. Cropping the picture helps put more focus on your subject.
Thanks for looking!
Posted by: TonyLaPetri
Re: How to Improve Your Knife Photos - 10/10/17 08:53 PM
EXCELLENT shot! Well Done.
Posted by: digi-shots
Re: How to Improve Your Knife Photos - 10/10/17 11:03 PM
Thanks, Tony!
Posted by: Buck Buchanan
Re: How to Improve Your Knife Photos - 10/19/17 12:43 AM
Thanks Linda, for your contribution.
Smartphone cameras are getting better and better.
I believe the iPhone X (Ten) will have a 12MP sensor and telephoto capability.
I appreciate your help as more people are using cell phones for photo capture.
Posted by: digi-shots
Re: How to Improve Your Knife Photos - 10/22/17 07:08 PM
Buck, youre right about cell phones. They may not have the quality or detail of digital cameras but it seems most people have them which means theyll be used more often.
I like to set my subjects up at an angle versus horizontal. The knife would look good either way, but placed at an angle makes the shot more interesting. To keep the shot from being too busy, the blades are parallel to the bamboo and the sheaths at another angle. The shot might have looked a little boring if everything was placed at the same angle.
I try to fill the whole frame with whatever Im shooting and go in as close as I can. Most cell phones will let you get pretty close and still be in focus. You can always crop out unwanted areas.
I like to add interesting items especially if they relate or add color or texture. More than two or three items can clutter the picture and detract from the main subject. If it seems like I have too much extra stuff, I take out one at a time until it looks right.
Ive seen some great shots on this forum... especially the ones featuring tree stumps, rocks and other outdoor settings.
Posted by: pappy19
Re: How to Improve Your Knife Photos - 10/22/17 07:19 PM
Don't forget to have a re-size app, or you won't be able to post on most forums, including this one.
Pap
Posted by: W Polidori
Re: How to Improve Your Knife Photos - 10/22/17 07:52 PM
You're correct Pap. I've been using app "Photo & Picture Resizer" for Android. Works like a dream. Could be others like it but this one works flawlessly. Approximate 1024x768 would resize under 250kb. These always upload without a problem. YMMV
Posted by: LarryWW1246
Re: How to Improve Your Knife Photos - 06/08/19 05:56 PM
Re-reading the posts I was looking for the information somebody had given about a material that could be used to prop knives at angles.
I think they said it could be bought at Home Depot or someplace like that.
Any information will be appreciated.
Larry
Posted by: TonyLaPetri
Re: How to Improve Your Knife Photos - 06/09/19 02:58 PM
Larry, I cant remember the name of it ... maybe something with tex or tech in it.
You can also use an artists Kneaded Eraser ... like a putty ... get at art supply store or arts & craft store.
Posted by: Holzinger258
Re: How to Improve Your Knife Photos - 06/09/19 03:23 PM
Maybe something like this?


